A decent stint of 15 hours this weekend. Makes up for doing nothing all week.
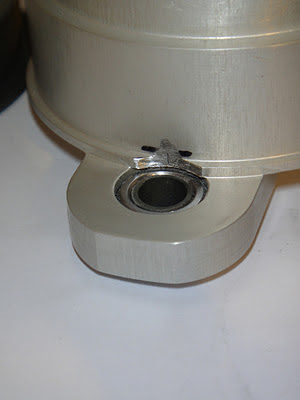
Just as well I didn't start the next part of the flap connecter job. Pete tells me it's a nightmare of a job and needs to be 0.1 of a mm correct! Also as you will see from the below photo there needs to be a bit of grinding of the connecter behind the bearing so that the pin has full travel through the bearing. As a quirk of the design the pins move relative to the connecter when the flaps are extended. This is because of the dihedral in the wings. So one pin ends up going further in and the other ends up coming out a bit. More on this job when I get to it.
Next up the Aileron counterweights. Which as you will see below need to be cut to the same angle as the edge of the aileron - something that is not mentioned in the manual (but inferred in one diagram). Pete says not to bond the weight to the panel at this stage so all I did was mix up some micro and bond them in. Micro is extremely small spheres of glass - so small that it appears as a powder to the naked eye - and is used as a lightweight filler for jobs where great strength is not required. (Flock is heavier and structural).
Bit of a fiddle to get the micro down into the aileron - which is done through the cutout for the counterweight panel - it is only about 10mm wide. The manual says use a wooden spoon - I don't have one of those so I made up a thin strip of wood and used that. The technique that worked best was to build up a mass of micro on the end of the wood and then carefully lower that down into the aileron and then once at the bottom 'wipe' the wood to one side and the micro would come off and stay put. About 5 goes of this and the area is covered in micro ready for the panel. The groove in the panel is also filled with micro and then inserted to the correct depth - leaving the weight at a certain distance out - this distance is critical as the counterweight is to prevent control flutter - a pilots worst nightmare. Worth taking some time to get this job millimetre perfect.
Next up is a even more fiddly job! Reinforcing the inside of the leading edge of the wing - to a depth of 1m. I thought I had long arms but they were nowhere long enough to get down inside there for this job (plus you are working blind if your arm is down there). So I taped a paintbrush to a long piece of wood and throughly wet out the area to be reinforced. Then dipped the 1m of tape in a cup of resin and squeezed out the excess so it was throughly wetted out before putting in place (do half of the length at a time). Using the paintbrush again I was able to position and glass tape in the right place and make sure it was wetted out and without air bubbles. Phew!
Finally at the root end a piece of carbon is used to reinforce this area. I used a new technique (for me) of clear polythene sheet to wet out the carbon cloth and avoid damaging this delicate substance (Carbon is so strong when finished but so delicate when in it's raw state). This is a great technique and avoids mess and allows for a very crisp edge to the carbon when cutting it.
The first stage is to cut out two sheets of clear polythene about 50mm larger than the final size of the job. Then mark up your required carbon size - in this case 100mm by 250mm. Cut your cloth roughly to oversize this area. Then mix up some resin and pour it directly onto the cloth. Put the polythene sheet back on top and then using a plastic card gently wipe across in several directions until the cloth is thoroughly wetted out. Then cut out to your marked line. Then you can take this to the job in hand and peel off one layer of polythene - place the cloth where it needs to be and then carefully peel off the other layer of polythene. A little very light work with your gloved fingers and you can work out any air bubbles - job done! Sorry I don't have more photos of this process but it's hard to do with resin on your gloves.
 |
| Grind off area of connecter where pin comes through |
 |
| Aileron counterweight panel |
 |
| Cut end to match angle of aileron edge |
 |
| Counterweight in place - excuse crappy photo |
 |
| Wing up on stand so I can get to the leading edge inner for next job. |
 |
| Tape and carbon reinforcing in place. |
 |
| Cutout polythene to oversize and mark with area needed |
 |
| After this point - pour resin onto the cloth and lower sheet back on top |

Hi, its been great following your blog. Having been looking over the manual over the last year I have found your pictures very helpful in understanding the build.
ReplyDeleteHere is Aus, the dealer Joe Luciani is building the first one (fixed gear, viking powered). I am hoping to put an order in early next year, once I have the shed built! Good luck Krishna