Monday 28 December 2015

Week 229 - Cowling Part 6

Hours to date: 2164.75

Cracking on with the mold until I ran out of resin! Got some more on order but it may not get delivered for a few days. 

I'm using the time to work on my motorbike.

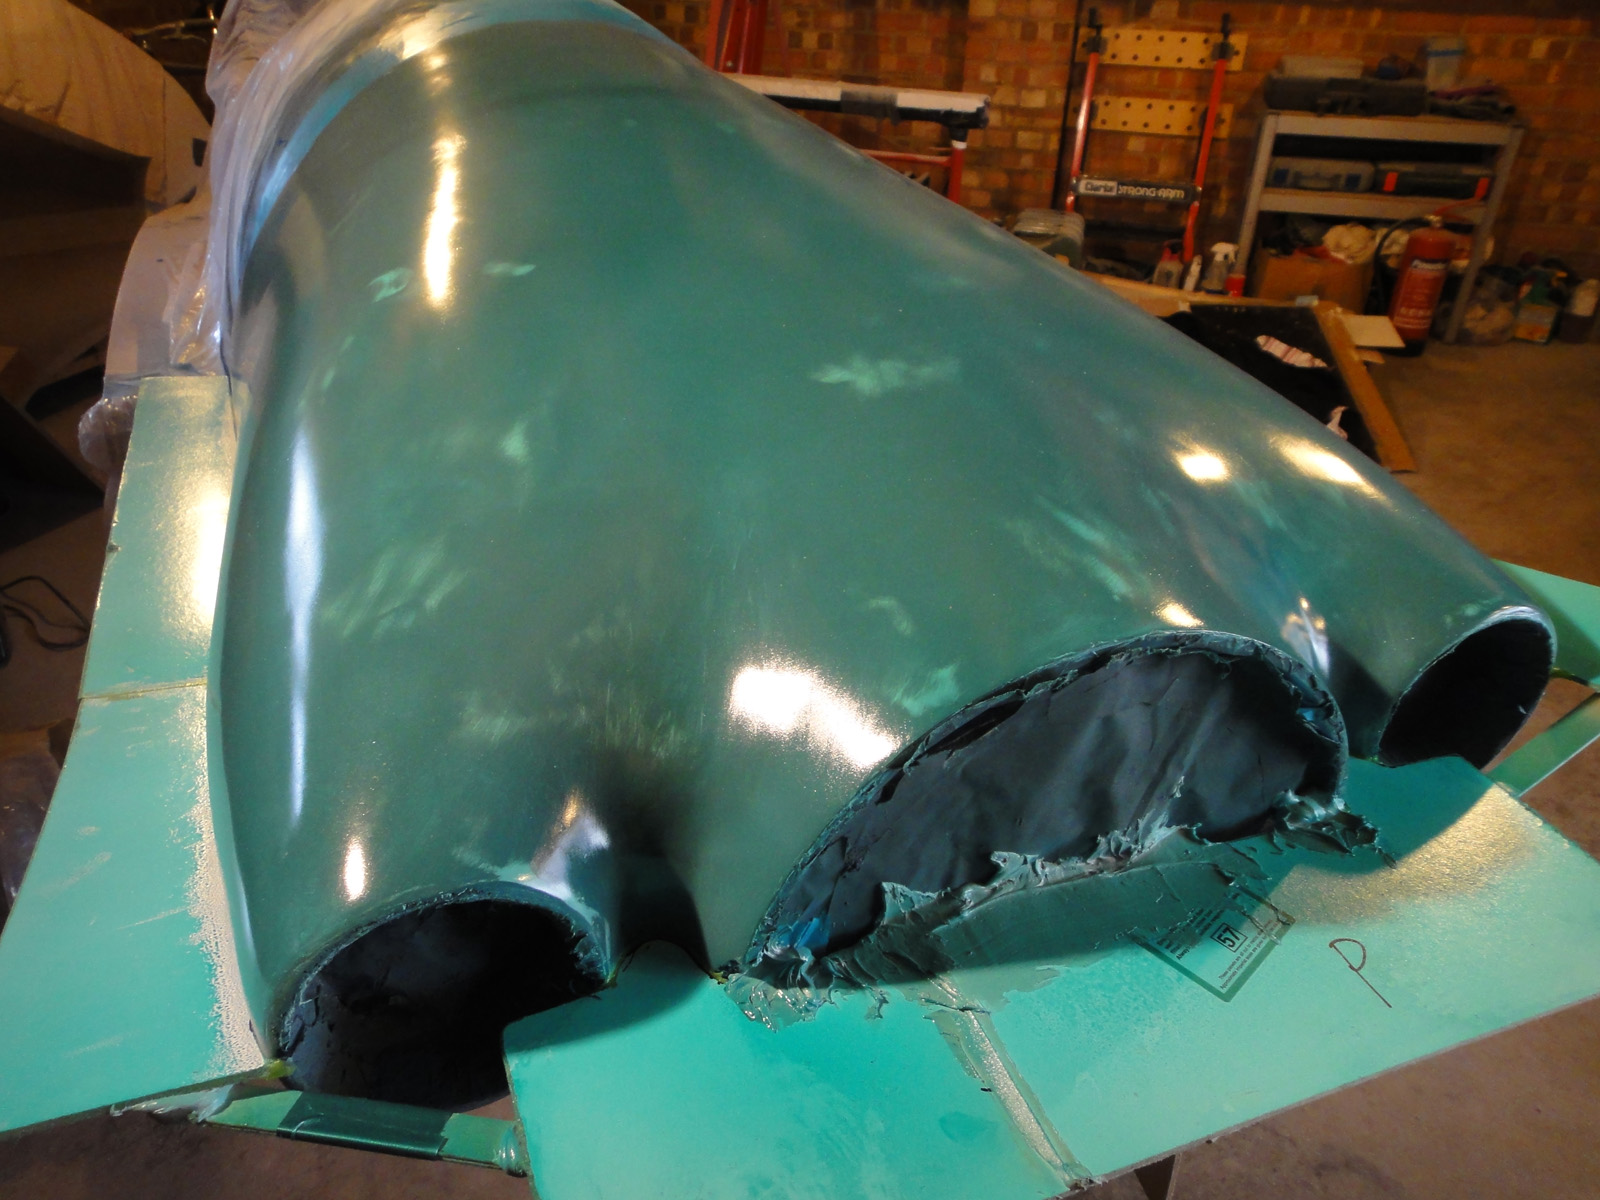
So far I've got the gelcoat on and one layer of light weight chopped strand mat, followed by 2 layers of thick chopped strand mat.

Another 3 thick layers and it will be done.

All I have to do then is add some plywood supporting braces - which will be glued in place using the chopped strand mat and resin - and the top mold will be done.

PVA release when dry - shrinks to form a smooth surface.

Gelcoat was clear so to make life easier when spotting mistakes a pigment was added - Tangerine of course!

Agent Orange. Brushed on thick gelcoat that forms the inner surface of the mold.

After 1 thin and 2 thick layers of chopped strand mat. Another 3 thick layers to go.

Not a Twister! My Benelli Tornado 900. New stubby carbon muffler fitted - going to be very loud.

Friday 18 December 2015

Week 227 - Cowling Part 5

Hours to date: 2158.5


The decision has been made - enough work has been done on the plug - I am now working towards making a mold from it.

Before making the parting supports I sanded the whole plug down with 320 grade sandpaper, used wet, then 600 grade - also used wet. Then gave the whole thing a good clean with warm water and a sponge.

After drying I put 2 coats of wax on and buffed them off - by hand, making sure not to take too much wax off.

Finally the plug was ready to accept the parting supports which are made from painted builders hardboard (known as Masonite in the USA) and hot glued into place. The hot glue from a standard hot glue gun easily peels off the waxed plug - so doesn't cause any damage to the lower half. The parting boards are only for the first half of the mold. When that is done they are removed leaving the mold which is now a perfect parting for the second half of the mold.

The small gaps between the hardboard and plug are then filled with filleting wax. This works best when it is warmed up. Scraping off any excess wax with a wooden stirring stick cut in half.


Now it is time to protect the plug and provide a release for the mold. The wax is a good base to protect the mold but I have also used 10 sprayed on coats of PVA which ends up making a thin skin which will allow (hopefully) for an easy release of the mold from the plug.

Hopefully this weekend I can actually start making the first half of the mold.

Filleting wax - for filling any gaps.

First parting board in place after sanding and waxing the plug.

Yellow stuff is filleting wax in the gaps.

Making up the parting boards for the sides. Using body filler to hold the bits of wood supports on.

Front and one side done.

Lots of supports underneath - parting boards held in place with hot glue where they touch the plug.

Other side done.

I screwed up the first attempt at PVA - getting used to my new spray gun. Anyway it is easily washed off with water and a sponge - start again!

Going much better this time - about 3 coats in here.

After 10 coats - last one is sprayed on thick and allowed to 'Orange Peel' then when it drys it shrinks and produces a smooth flat surface. This photo was taken just after spraying so it doesn't look smooth yet.
 

Monday 7 December 2015

Week 226 - Cowling Part 4

Hours to date: 2141.0

Those of you who are observant will have figured out I am now up to about 85 hours on this cowl project. If you're getting bored with it imagine how I feel!

I had a very down day after spraying on the guide coat and sanding it down - there were low points EVERYWHERE.

My technique had been wrong all along - working in small areas rather than in big sweeping movements at 45 degree angles - as it should have been.

Watching the master Mike Arnold at work I soon learned what to do.

Ironically I have all his other videos on DVD except for the one which shows how to make a plug. If only I had watched it before I started this job it would have saved a lot of pain.

The video in question is here: https://youtu.be/qStFDcZs5Og

If you find that interesting then I highly recommend watching all his other videos - so much to learn from this guy who I rate as the 'God of Glass'.

Anyway back to the amateur - me. 

So what I had to do was cover the entire surface again with a layer of body filler. I've gone through another 4kg tin of filler!

Then sand that off using the big sweeping movements and repeat until all the low points are filled - that's where I'm at now. I've just sprayed yet another coat of primer and it's looking very good, it's not perfect, you could spend forever on this but it should be okay for a mold.  

I've just started making a bridge for the split line as the mold has to come off in two parts due to 'draw' - you cannot remove a mold from a negative angle. In this case the only way to split my mold is along the thickest part of the sides.

I don't think I'm going to get much done this week as I'm off to Barcelona for two days but will hopefully get back on it over next weekend.

Covering with a layer of filler due to my shit technique

Thinking about buying shares in a sandpaper manufacturer about now.

After much more sanding and filling and primer. But is it ready?
 
 Quick video of the cowl as a walkaround. I'm really happy with the shape.

Monday 23 November 2015

Week 224 - Cowling Part 3

Hours to date: 2115.75

After 20 odd hours of filling and sanding I decided it was time to try a coat of primer to see just how imperfect things were.

Still quite a bit more work to do of course but things are looking not too bad on the top and upper sides plus the lower front half.

I've used nearly a whole 4kg tin of filler (and sanded most of it off again) to get to this stage.

After 'flatting off' the primer it's easy to see the low and high points that need attention. I've also bought some guide coat paint which is black and will use that next I think as it shows where low points are even clearer than the grey primer does.

Just got to keep plugging away at the plug till it's perfect. :)

Grey stuff is body filler. White is micro underneath.

Time for a coat of primer.

I've painted the spinner too so it's easier to visualise the whole thing together.


After flatting off the primer and filling mistakes - looks like a man that's cut himself shaving.

Monday 9 November 2015

Week 222 - Cowling Part 2

Hours to date: 2096.0

I seem to be making good progress with the cowl. 

Although the early stages give big gains in a short space of time the further into this we go the smaller the gains. The basic shape comes quite quickly then making that shape 'perfect' for the mold takes a lot longer.

That 'making it perfect' stage is where I am at now and will be for some weeks to come.

I ended up using all my 2 part foam, about 6kg in total. It expands up to 25 times in size. It kicks off quickly with an exotherm and gets hard enough to work in about 30 minutes.

To carve the foam I used a rasp, and in places where access was limited - in between the inlets and spinner for instance - I used 40 grit sandpaper.

As you can see the foam did not go perfectly so there were a few cavities that needed further foam to fill them.

After shaping for about 5 hours I switched to Micro and put a thin layer of that over the foam to seal any holes and give a smooth(ish) hard surface.

I've done two layers of micro at this stage and have now switched to body filler as it is much quicker to work with.

To start with I wasn't in love with the cowling shape - particularly at the bottom where it looked a bit 'fat'. But after covering with micro and sanding that down it seemed to grow on me. I am happy with the front though - it looks quite sleek and low drag looking.

The next few weeks will be spent getting the plug to perfection as any flaws will be transferred to the mold and subsequently the part and we don't want that.

Getting the basic shape sorted in foam - this stage goes quite quickly

Some cavities need filling with more foam.

Looking sleek at the front

First layer of micro on.

After sanding the micro. Liking the look of the shape even more now.

Cowl will be a bit asymmetric due to the staggering of the cylinders.

Bit of a 'fat bottom' but i think this will visually disappear when it is painted black.


Monday 2 November 2015

Week 221 - Cowling

Hours to date: 2078.5

The carbon brackets worked out good and are plenty strong enough.

I've put them in place and they will be good indicators for the foam carving to see where to stop.

I'll let the photos do the rest of the talking here.

Carbon brackets that will hold the cowl out at the back.

Brackets in place.

Ditto

Cardboard lined with a bin bag so the foam doesn't stick to it.

Final - double layer of protection for the engine before pouring foam.

All ready to go.

Eek - what a mess.

Frankentwister - I've created a monster!

2 hours later - we are starting to see a shape we like here.
 

Tuesday 27 October 2015

Another elipse in the skies


From France comes another elliptical wing design light aircraft.

Find out more at: http://www.vh2streamline.com/

I am also pleased to see the outlets for the cowling being on the side!

They are claiming a 145 knot cruise (@75%) with a Rotax 912.


Monday 26 October 2015

Control surface deflections

Something worth noting - when I state a control deflection then it for the UK only and does not correspond with the official Twister Flight Manual. See below.

Only the elevators are the same.

And in the building manual the flap deflection is different to the flight manual.

Maybe the flight manual needs updating?


UK LAA data above, Flight Manual below.
From the building manual - flap deflection does not match up with the Flight Manual.

Week 220 - Throttle cover, Spats and Cowl

Hours to date : 2064.25

The wheel spats are virtually finished now - lots of hours put into these but the fit is now spot on around the gear leg.

The throttle cover is finished now too - just needs painting. It fits very nicely.

It must be time to start on the cowling!

First things first - I have made up some molds for brackets which will hold the cowling clear of the fuselage at the rear - by 25mm at the bottom and lower sides then gradually blending into the fuselage further up.

This results in quite a large exit volume with little drag penalty - as I hope to not have a lip on the exit. I'm also making use of the low pressure area on the sides of the fuselage to help the air leave the cowl easier. Something the Sea Fury and most other late model air-cooled fighters of WWII did.

If you look at the inlet and exits for the Sea Fury it is hard to believe they were enough to provide good cooling for 2,500 hp - a masterclass in cowling design I'd say. The designers also made use of the high speed flow out of the exhausts to suck the low pressure air from the cowl.

Having taken measurements of Pete's cowling inlets and exits I am happy to report that my inlets will be just over half the size of Pete's. With the outlets I am about two thirds of his volume - and without that drag inducing lip (and louvres) he uses.

Pete's inlets total 42,900mm squared, mine total 22,200mm squared.

Pete's outlets total 65,600mm squared, mine total 49,600mm squared with the oil cooler cowl flap open and 44,875mm squared with it closed.

As always the proof will be in the testing but with my sealed plenum then straight away we are talking about a 50% increase in efficiency. With the oil cooler I hope that there will be a further drag reducing element as well as an increase in efficiency with the ducts and sealing. The front of the cowling should also prove less draggy, particularly in the lower front cowl area (where Pete has his oil cooler).

Another principle of good cowling design is to have as little surface area as possible - and certainly no flat plate area's within 150mm behind the prop. Something my design allows me to do.

To allow for any changes to the design I will make a removable piece around the exhaust area which can be easily changed should my design not prove to work perfectly first time round.

So bear with me dear readers as the next few months will just be about the cowling - I hope it proves an interesting exercise - even though most of you will never need the information (you're much too sensible to build your own cowling!).

First stage is to protect the engine before pouring expanding foam around it, so that's where I'm up to this week.

Hopefully I'll be ready to pour foam next weekend and get carving.

Fitting spats to the gear legs - filling gaps with flock.

Making the mold for the throttle cover - wood is to hold the foam against the fuse side.

Spats fitting pretty nicely now.

Throttle cover all done - bar painting. I used 4 layers of glass for this, it weighs just 36 grams.

Covering the engine - putting foam around all the sharp bits first.

Foam is to stop the plastic covering from piercing on any sharp bits.

Making up the cowling brackets - these are 10mm deep for the upper transitioning section

Ditto - these are 25mm - for the rest of the cowl. Using 7 layers of carbon here.

Bye bye engine. See you in a few months.

Hawker Sea Fury cowl. Not much exit volume for 2,500hp.