Friday, 17 February 2012

Cowling design - Part 3

Well I have done absolutely nothing on the plane now for 10 days. Been struck down with a bad case of 'man flu'.


Seems to be taking ages to get rid of it so in the meantime I thought I would do a further update on the cowling design.


An interesting read was a piece about calculating total drag on a Messerschmitt 109E by Hoerner (considered by many as the God of aerodynamics).


In this article is transpired that exhaust thrust was quite a significant factor. Much more than I was expecting it to be.


The propellor produced 1,000lbs of thrust and the exhaust stacks produced 140lbs of thrust. So the exhaust was adding approx 14% of the total thrust.


Of course the 109 did not have mufflers to slow the exhaust gases down so this figure of 14% would be high compared to the UL Power set up which has a muffler.


Still, why not take advantage of that thrust rather than ejecting it at a steep downward angle and wasting its energy?


Exhaust detail. BF 109E


Another book which is well worth getting hold of is Economy with Speed by Kent Paser. No longer in print - I was able to get a copy from the States but it was not cheap (£30 I think).


Kent Paser was a NASA engineer who also built his own plane and then over the course of 20 odd years modified it. All the while recording the results of each modification so he knew absolutely what worked and what did not.


Without increasing engine size or burning more fuel he was able to increase the top speed of his plane by 64mph.


A good bit of this speed came from cleaning up the draggy parts of the airframe. 


What's relevant to us is a whole section on engine cooling. Which improved speed by 7mph. Part of it is about exhaust augmentation but mostly it is about improving the efficiency of the system.


His main points were:


· Add full pressure plenum to the top of the engine for efficient and equal pressurization of cooling air to all cylinders. The plenum also removes the problem of the cowl rising off of the traditional baffles at higher speeds.


· The smooth outflow of air at the cowl exit is just as important as a smooth inflow of air at the cowl inlets.


· Exhaust “jet-pump” helps pull air out of cowl.  Resulted in significantly cooler cylinder head and oil temperatures.  If the cooling is more than is needed then the cowl inlet size can be reduced, resulting in significant Aero-dynamic improvements.


· Reduced cowl inlet size 4 square inches at a time until CHT’s hit the bottom of the temperature range.  Initial size was 60 square inches.  Final size was 30 square inches!!  This experiment cannot be optimized until a CHT/EGT is placed on each cylinder and the under cylinder baffles must be optimized to get equal CHT’s on all cylinders.  At this point reducing the inlet size until temperatures begin to go up means that all of the air going into the intakes is being used and none is spilling out as excess, thus reducing drag.


All good. And another thing that came out of this book was possibly a better location for the oil cooler.


He copied the Mooney system of putting the oil cooler on the back of the plenum as shown below.


Mooney style oil cooler placement (pic is not of a Mooney BTW)


There may just be room to try this on the back of the UL - right hand side as viewed from the cockpit.


If this works it would certainly reduce the drag compared to the existing set up - a massive hole at the front of the cowling.


This current set up is not at all efficient - Pete has the largest available oil cooler on there and no ducting of any kind to slow the air or smooth the flow at either side of the cooler.


It does work - he has good temperatures but it most certainly is not the most efficient set up.


Radiator theory states that the opening can be 1/6th of the size of the cooler itself if set up correctly. Pete's set up is 1 to 1 - ie: the opening is the same size as the radiator face.


The problem is one of space - and trying to do this under the cowl at the front is a bit impossible - time will tell if things can be improved with this Mooney style set up.


Also if my memory serves me correctly Pete does not have a sealed plenum on top of his engine - he relies on the top part of the cowl to seal - and everything I have read says this is quite inefficient as far as cooling goes with big loses in the gaps that open up due to this system.


Last pic to close out this post is of the round inlet composite air box plenums for the UL Power engine. (which do seal completely).


Monday, 6 February 2012

Rego confirmed

Got a letter back from the CAA on Saturday - they processed the registration application very quickly. 


I can now confirm that the rego is G-FUUN.


When most people fly the Twister and are asked how was it - they ponder for a moment and then say "Gee... Fun!"


When I'm asked the question I'll be able to just smile and point at my rego!

Week 25 - Root rib and preparing parts for filling

Hours to date: 267


Spent most of the last week preparing parts for filling (car body filler works fine).


So stripping off peel ply where needed and sanding - LOTS of sanding. If you don't like sanding then the Twister is not the kit for you.


I haven't put any filler on yet - it stinks like crazy and I would like good ventilation in the garage when I do this. At the moment it is so cold here (snowed yesterday) that I cannot have good ventilation and keep the workplace at a reasonable temp to work in, so will leave this until things warm up a bit.


Also put a little more flock reinforcing on the aileron horns as they were still a bit flexible - now like a rock.


Had a go at reinforcing the wheel well hole (this comes from the factory in the same configuration for the retractable version as well as fixed gear). The carbon does not want to wrap over the sharp edges of the rib - so I will add some micro here to make the edge a more rounded profile. In the meantime I have closed up the hole a bit using carbon strips either side to make a trench which I will fill up with micro. On the fixed gear this hole only needs to be big enough to put the bell crank through - other than that it doesn't need to be there and is weakening the structure. Filling it up a bit will make it stronger without adding too much weight - the micro is a very lightweight filler.


I've also glassed the back of the rib - as Pete does. It should be plenty strong enough when done.


Got to do the same with the other wing now.


Parts prepared for filler

Aileron horn with extra flock reinforcing

Carbon strips making a trench and filling in the wheel well hole a bit

Friday, 3 February 2012

Turbine Twister in FSX - 2 new pics

They must be getting close to releasing the new version of the Twister - a couple of new shots for you in the meantime.


It would need those extra drop tanks too with the fuel burn of a turbine.


- NEWS FLASH - new version was released today (just got the email from IRIS).


Monday, 30 January 2012

G-FUUN in FSX

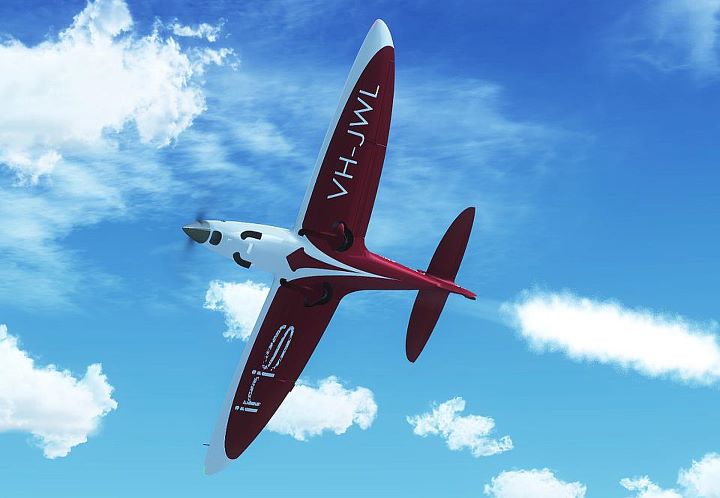
Been mucking about in Photoshop and got the Twister looking how I intend to paint it.

No better place to test out the paintjob than in Flight Simulator.

A short video on this link below and some screenshots below that.


Also sent off the form to the CAA for registration - hopefully I will get G-FUUN (nothing else shows up on the database under that rego). It costs 227 of our English Pounds for the privilege of an out of sequence rego in the UK.

New paint job - rego is in mirror finish chrome.

On the main runway at Duxford.

I changed the panel to be carbon - because it looks cooler :)

Overflying Duxford.

Week 24 - Rudder, Bell crank covers and Rear wing pin rib

Hours to date: 257

Not much more I can do to the rudder now until it meets up with the fuselage. All seams have been reinforced and the counterweight is in.

The bell crank covers look quite snazy now they have the allen head countersunk screws in place. Flush now with the top of the cover (and the airstream) - unlike the dome head self tappers the factory supplies.

Last job this week was working in a confined space again - flocking in the Rear wing pin rib. Not the neatest of jobs I made there but it is certainly strong enough. (if anything I over flocked!).

I've run out of Flock now so have ordered some more and will be doing the carbon reinforcing of the root rib in the meantime.

Rudder seams reinforced.

Bell Crank covers with allen head countersunk screws

Rear wing pin rib - set in place with flock

Wednesday, 25 January 2012

V-Noise

Nothing to do with Twisters but some nice aviation sounds from the one off Osprey GP5 Reno Racer - with a Chev V8 (and no mufflers) and an old favourite the V-12 Merlin - run up inside a hanger. A good way to go deaf!


http://www.youtube.com/watch?v=hGpxKY95U3s


Twister in FSX - New version coming soon

Well it seems IRIS have listened.


They are going to release a Version 2 of the Twister soon and will address the following issues.


1. Flap and Gear will be able to be assigned to joystick buttons. (my biggest gripe)


2. Integrated tailwheel version added. (2nd biggest gripe)


3. Optimised textures - giving better frame rates. (all good)


4. Night option with landing light and gauge backlighting (Kind of irrelevant for a VFR only machine in the UK - but in the USA it could be made night legal) 


Also the price will be massively reduced - I saw it on one site for 8 euros - which is a 75% reduction from the original EU price of 32 euros.


I should point out that after more extensive flight testing it flies extremely well - full spin and flick roll capability. The side slip is still not enough compared to a real aircraft - I find I am running out of rudder with only a small bank in the side slip. Yet strangely it is possible to do a knife-edge fly past - so the model does not lack rudder authority.


Also it looks like they are adding a Turbine version! 


I remember being at Oshkosh in 99 and a guy there had put a P&W-PT6 in his RV4 - his 'party trick' was being able to hover vertically - then climb away vertically - that was really impressive. I'M WRONG IT WAS NOT AN RV-4 - THE RAVEN WAS A ONE OFF ALL COMPOSITE DESIGN (NOT FLYING ANYMORE AFTER AN AIRSHOW CRASH. ON YOUTUBE HERE: http://www.youtube.com/watch?v=BJWjbpA_zIc) MORE INFO ABOUT THE RAVEN HERE: http://www.waynehandley.com/archive.html


There are some more paintjobs coming in the 2nd version too - including this 'Oz Racer'.


Oz Racer

Turbine Twister!

Sunday, 22 January 2012

Week 23 - Rudder, Rear wing rib and Bell crank covers

Hours to date: 247.75

Well it turns out that I was making a mountain out of a mole hill with the bell crank bearing.

I thought I would have to take out the entire bearing which was going to be a real mission as it is hard to get to and I would have been working blind. It ended up being a simple case of turning the inner part of the bearing through 90 degrees and then pulling it out with a set of pilers. So I just have to replace the inner (light coloured) part and it will be all fixed.

The dumb thing I did was Dremel the edge so I could get the bell crank to slide in easier - the actual fault was that the hole on the wing was not large enough and so the bearing was not able to rotate fully - seems silly now, but should be an easy fix.

Onto the bell crank hole covers now. It is a metal plate that the factory supply with small self taping screws to fit but Pete does his a different way and I decided to follow that route. So I have drilled out the holes and then tapped a thread into them. Also made the holes countersunk on the metal plate to accept countersunk head machine screws. It feels a little more permanent than the self tappers.

I also started on the Rudder. There is not too much I can do to it without the fuselage, but I have put the counterweight in place. This involves drilling a hole as shown in the photos - then pouring 100grams of resin and 250grams of lead shot into the front part of the rudder. I sealed up the hole afterwards with a carbon washer filed to a neat fit and flocked in place.

Finally I have decided to do what Pete does with the rear wing spar and reinforce on the inside as well as the outside. Imagine working blindfolded with wet spaghetti in a confined space that your arm just fits through and you will get a feeling for what this job was like. I just stayed as 'Zen' as possible and took my time - seemed to work out okay.

I still have to put some carbon tape on the root rib, plus reinforce the rear with glass tape and flock in the rear pin support - will most likely do those jobs this week as well as reinforce the seams on the rudder.

Bell crank bearing comes out at 90 degrees.

Bell crank hole cover with countersunk screw holes


Hole in rudder for counterweight

Lead shot and resin in the front of the rudder.

Hole covered with carbon washer and flocked in place.

Tuesday, 17 January 2012

Week 22 - Aileron horns and leading edge reinforcing

Hours to date: 237.5


Back in the groove now. 


Latest work has been on the Aileron horns which need reinforcing on each side with a carbon washer. Pete said this should be included in the kit but they were not in mine so to save time I made some out of the scrap Carbon sheet using the trusty 30mm hole saw. The 6mm bore then needed drilling out to 8mm to accept the Plastic bearings which push fit in each side.


Now I have resin again I was also able to complete the leading edge reinforce on the Starboard wing.


I also did something embarrassingly stupid with one of the bearings for the bell crank and wrecked it in the process. So it looks like I will have to remove it and put a new one in. Joy.


Strengthening on Aileron horn with Carbon washers
Starboard wing Leading Edge reinforce

Got some more fitting to do here as the pushrod still touches


Tuesday, 10 January 2012

Training Day 3

Rather than post about my own progress this week I decided to share some photos of Pete's Twister I took last weekend.


As you will see he does things a little different to the manual.


He builds the planes stronger than the manual says to. His planes do get maximum abuse as they are flown to the extreme of their envelope pretty much every day. Each of his Twisters does 350 hours a year, and a good bit of that 350 hours is aerobatics.


Onto the photos - and as you will see from the wing rib photo that his is in an even worse place than mine. He took so much rib off to fit the bell crank pushrod that a reinforcement behind the rib was needed. Sadly I did not take a photo of this but it consisted of 4 layers of glass, plus flock in the voids left in the honeycomb.


Quite a fiddle to get in behind the rib to do this job - arm through the flap counterweight hole - and you are effectively working blind.


You will also see that he does his fuel drain a different (better!) way - only drilling the holes that are needed right though the bottom wing skin and tank - unlike my method of making another smaller hole. Although this is what the manual tells you to do.


The other job I watched him do was fit a fuel level sender. This sender goes to a mechanical gauge and with the fuel flow meter on his Dynon that gives him two independent fuel readings.


My resin arrived yesterday so I will get cracking again this week.


And I thought my rib was in a bad place!

Fuel drain with holes drilled only for overflow and drain

Fuel sender

Support rib for rear wing pin - my next job

Nylon washers to space the controls into the right place

Wednesday, 4 January 2012

Week 20 - Starboard wing and revised paintjob

Hours to date 221.75


Pretty much up to speed with the Starboard wing now.

I've kind of ground to a halt as I've run out of resin. Yes the little bit that the factory give you with the kit is most certainly not enough to do the whole aircraft. Same goes for the fiberglass tape - the 40mm tape is running out now. Luckily Pete gave me some extra tape and I have just ordered some more resin so hopefully it will be all systems go again by next weekend.


The starboard wing does not seem to be made as well as the port one. Just little things here and there, but a more major thing cropped up when I drilled the hole for the bell crank and found the rib underneath to be in a different place to the port one. 

I made a paper template of the port wing section where it's bell crank hole was and the markings are in exactly the same place on the starboard wing - so it wasn't a case of it being marked up in the wrong place. Also the aileron when fitted has it's horn lining up perfectly with the hole which also leads me to think the rib was fitted in slightly the wrong place. We are only talking about 5mm here but it does make a difference.


Anyway it is not the end of the world and can be reinforced from the other side, but I must say it did worry me when I first saw it. Now I have filed it down a bit it seems to be not quite so bad as I originally thought. I will most likely be up at Pete's again this weekend for another training day and he has promised to show me how to fix it then. I will post again about this when it is done.


Starboard wing rib

Port wing is fine


In the meantime feast your eyes on the latest version of the paintjob. A bit more flowing now - not so many straight lines as before. Also there is now a chrome-like (think McLaren F1) strip that separates the black and orange. Should look quite funky when done.