Made some more progress with the fuel tanks this weekend.
I finally got hold of some hole saws and mandrels (the part that holds the hole saw and goes in the drill).
Unfortunately my drill only has a 10mm chuck and the larger mandrel was much bigger than this so I had to spend about 2 hours turning this down so it fitted in my chuck. As I don't have a lathe this was a slow job with a coarse file and then the Dremel to finish.
Before I drilled anything I did a 'gross error check' by turning all the lights off in the garage and shining a very bright LED lamp underneath the wing and also one inside the fuel tank from the root end and this allowed me to see where the markings were that I had made. The copper tape on the tanks shows up as an indicator very well using this method.
It is okay to be paranoid about screwing this job up as you are drilling close to the main spar and I just had to see for myself that I hadn't made a gross error as there is no going back with this job.
Using the hole saws set your drill to the slowest speed. I made a small pilot hole first of 2mm after measuring many times! (note the number of markings I made). Then a 6mm hole all the way through and only then did I use the hole saw. I couldn't get hold of a 88mm one so had to use an 86 and then carefully Dremel out the extra 2mm all round afterwards.
The first larger hole must only be drilled down through the top layer of the wing skin - as soon as you hit the honeycomb stop. (see pic).
Then change to the smaller 75mm hole saw and this time cut all the way through including into the tank itself.
Now clean out the honeycomb that is left between the smaller and larger holes.
Take care to line up the fuel cap with the airstream and mark the metal recess part up so it's bonded in the right place.
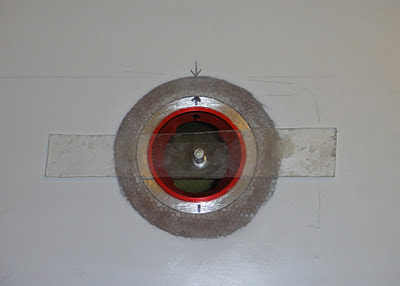
Pete has lent me a tool he made up out of perspex which helps the cap be bonded flush to the wing surface (see photo).
I got to this point and then wimped out! Decided it was the end of a long day and I would leave the bonding in till another day when I am up for it.
The rest of the day I was making up some little carbon ribs for the ends of the ailerons. These are not supplied as part of the kit and Pete had said to put a piece of styrofoam in there and then glass over but I decided to make these out of the thin carbon that was left over from all the other parts. They only weigh less than 3 grams each so shouldn't be a weight problem, plus they won't need glassing over - just flocking in the gaps and edges should do the trick.
The final photo shows the technique for fitting the control surfaces - use a piece of sandpaper down the gaps and slide it back and forth until the control surface moves freely without binding or rubbing on anything. Note the sandpaper should be used on the wing and not on the control surface as that is thin and you will soon go through it.
Hopefully in the next post I will be talking about having successfully bonded in the fuel cap.
 |
| Outer hole - stop drilling at this point |
 |
| Inner hole cut right through |
 |
| Lining up the fuel cap parallel to the airstream |
 |
| 'Scarf' 20mm round the edge for glassing to come later |
 |
| Perspex tool to hold cap flush with wing |
 |
| Aileron end - instructions do not say to do any more |
 |
| Left over carbon from other parts |
 |
| Carbon rib |
 |
| Sandpaper in wing method to fit surfaces |

No comments:
Post a Comment